So you passed rough-in inspection. Congratulations. The inspector signed off, the electrician packed up their tools, and you're feeling pretty good about yourself. You made it through the hardest part, right?
Wrong.
The next 48 hours are the most dangerous window in your entire renovation. Not because of anything structural – but because of what you're about to lose. The insulation truck is scheduled for Thursday. That means you have exactly today and tomorrow to photograph every single wire, box, and conduit that will soon be buried forever behind fiberglass and drywall.
I didn't do this. I took a few photos – the "look at my progress!" kind you send to your partner. I didn't take the useful photos. And six months later, when I needed to know exactly where that junction box was, or which direction that conduit ran, or whether the electrician actually left a pull string in the media wall conduit – I had nothing. No record. No reference. Just a finished wall and a sinking feeling.
I'm writing this so you don't make the same mistake. Here's exactly what you need to photograph before that insulation truck shows up.
Why this moment matters
The insulation is the point of no return. Once it goes in, you can't see anything anymore. You can't trace a wire. You can't verify a label. You can't confirm that the conduit actually goes where you think it does.
You might think "I'll just remember" – and you will, for about two weeks. But by the time you're installing your smart switches in month four, you'll have forgotten the color of that sheathing, the number of wires in that box, and whether the electrician left a service loop or just terminated it flush.
Photos are memory insurance. And they cost nothing compared to the price of opening a wall.
The master shot – where you're standing
Before you start close-ups, take a wide-angle photo of every single wall before insulation goes in. Stand in one corner and shoot the opposite corner. Include the studs, the subfloor, and any visible landmarks.
This is your "context" shot. It tells the next person (or future you) exactly which wall is which. When you're staring at a finished room and trying to figure out which side of the stud that conduit runs on – this photo is your savior.
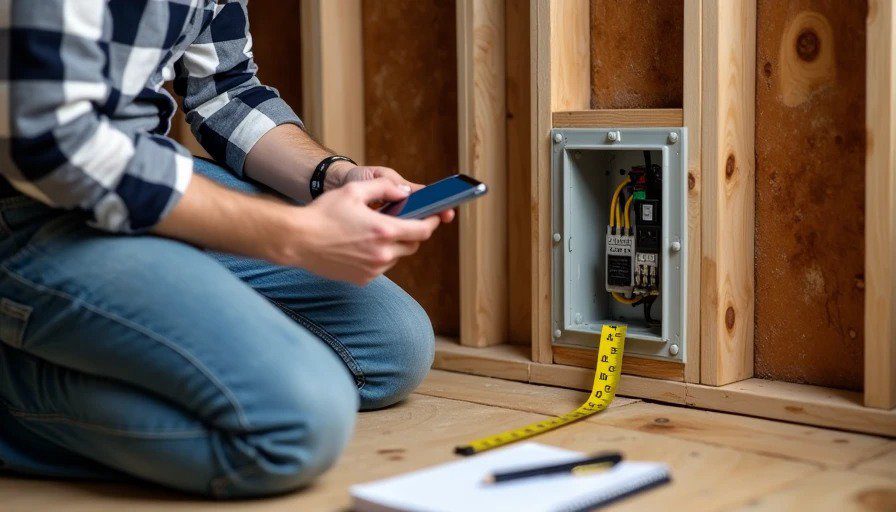
The junction box – your wiring headquarters
For every junction box, take a straight-on, well-lit, high-resolution photo that captures:
The box itself (depth and material – metal or plastic)
The cables entering the box
The wire colors visible at the cable entry point
Any markings on the sheathing (often they write the circuit number here)
Do not – I repeat, do not – close that box without a photo of the inside before the cover is installed. This is your only chance to capture the wire nut configuration. It also helps you verify which circuit serves which wire if your labeling gets smudged later.
The wires themselves – not just the boxes

Walk every run and photograph:
Each cable before it enters a box (sheathing color, gauge, number of conductors)
Any twist or junction that wasn't in a box (this shouldn't exist – but if it does, document it)
Every wire label – if your electrician used sharpie on the sheathing, photograph it before it gets scuffed
I learned the hard way that sharpie on Romex sheathing fades over time. A photo preserves the label for as long as you keep the file.
The conduit – the pipes of your smart home
For every conduit run, photograph:
The start point and endpoint
The path it takes (is it along the top plate, floor, or through a stud?)
Any bend points or pull boxes
The pull string sticking out both ends
The labeling on the conduit itself (if you were smart enough to label it)
Trust me: when you're trying to fish a new cable through that conduit two years from now, knowing exactly which conduit goes where and which bend is the one that's going to give you grief – that's the difference between a 20-minute pull and an afternoon of swearing.
The distances – where things are relative to each other
Here's a trick that sounds stupid but works every time: put a tape measure in the frame for every photo. I'm not kidding. A photo of a junction box on a stud is useful. A photo of that same junction box with a tape measure showing it's 18 inches from the corner is evidence.
Digital cameras don't have a sense of scale. You will forget how close that box was to the window, or how far up from the floor that low-voltage plate sits. A photo with a ruler or a standard tape measure gives you permanent scale.
The labels – what they are and where they're going
Label everything you can. And then photograph the labels. I had a spreadsheet that I thought would be enough. It was – until I realized my spreadsheet said "bedroom switch" and I had three different bedroom switches and no way to match them to the actual boxes.
If you label your wires with a thermal label maker or just sharpie tags, take a photo of each label in situ. Pair it with a shot of the panel label showing the matching circuit number.
The final checklist – before the truck arrives
Here's a literal checklist you can copy and print:
All four walls – wide shot, from a known corner
Every junction box – straight-on, before insulation
Every wire entry – into each box, showing cable color and marking
Every conduit run – path, bends, pull strings
Every label – sharpie or sticker, before mud or scuffs
Distances – tape measure in frame wherever possible
Panel – the final connection points with labels visible
Special attention – any place you're expecting future work (e.g., that extra pull string you left for future solar, or the conduit stubbed out to the carport for an EV charger)
How to store all this

Option one: a dedicated folder. Name it [project name]_roughin_photos and back it up to the cloud. I use Google Photos with the date and stage as the album title.
Option two: a printed binder. Some homeowners print and laminate key photos and keep them in the electrical panel cabinet. Overkill? Maybe. But the next owner will think you're a genius.
Option three: mark them in your renovation journal. If you're keeping a physical notebook, glue in a contact sheet. This sounds old-school, but there's something satisfying about flipping through a physical reference.
My recommendation: do all three. Digital plus physical is belt and suspenders. You'll never regret having too much documentation.
One final warning
The insulation truck will arrive on time. They will not wait for your photo session. They will not check if you've documented everything. And once that fiberglass goes in, those wires are gone forever.
So take the time. Use your phone, your camera, your partner's phone – whatever gets the shot. Take one photo, then take three more from slightly different angles. Take photos even for wires you think you already understand. Future you will thank present you.
Now, go. Before that truck arrives.
No letters yet — pray write the first.